Grand-project (cooperation with NeuralMD)
While a project is designed for managing a single atomic structure model, a grand-project can handle calculation results from multiple geometries.
Creating grand-project
In the original structure project, click Grand-project in the lower left menu  .
.
A dialog will appear, allowing you to choose the Type of Grand-Project to create.
- NeuralMD
Create training data for Advance/NeuralMD and proceed with training the neural network.
Within a grand-project, you have the capability to generate multiple geometries based on original one, calculate total energy for these geometries, export the result to a single training data file, and also execute NeuralMD to train the neural network.
Click the button on Path of Grand-Project and save it with any name. This will display the grand-project view.
The grand-project is shown as icon ![]() in explorer, along with other projects and models.
in explorer, along with other projects and models.
NeuralMD
Note
Since the NeuralMD executable files are included in NanoLabo Tool, there is no need for a separate installation. When utilizing remote execution, these executable files are automatically transferred to the server, similar to other calculation engines (QE/LAMMPS).
Note
The license information on this page is for NeuralMD version 2.0 or later. If you are using a version of NeuralMD prior to this, please refer to NeuralMD Configuration (Old License).
Note
If you want to train a neural network, you need to purchase a NeuralMD license separately. A NeuralMD license is not required for structure generation using the Metropolis method or for testing the neural network.
If you purchased the NeuralMD license together with your NanoLabo license, you do not need to perform any separate license configuration.
If you purchased NeuralMD additionally at a later date, license configuration is required. Please configure the license according to the NeuralMD documentation.
Note
Please check the following if you submit jobs to remote compute servers, etc.
If the remote machine where you execute the calculation is the license server for the NeuralMD license: No additional configuration is required.
If the remote machine where you execute the calculation is different from the machine acting as the NeuralMD license server:
On the remote machine where you execute the calculation, create (or edit if it already exists) the
hasp_32462.inifile in$HOME/.hasplm/and write (or add a line if it already exists) the IP address or host name of the license server, referring to the example below.If the IP address is 192.168.00.000
serveraddr = 192.168.00.000This step is not necessary if you have already configured the NeuralMD license separately on the remote machine where the calculation will be executed.
Note
If you are using NanoLabo on macOS, you can use the NeuralMD cooperation function by remote execution (currently, the macOS version of NeuralMD has not been released, so local execution and execution on remote macOS are not possible).
User Interface Overview

Brief usage example
Ensure that the original geometry is displayed at the top of the column.
Check Use for Training NNP in Random Geometries #1.
Click Generate Geometriesto generate random geometries.
Click Run to initiate the SCF calculations.
After the calculations are completed, click Start Training NNP button on Training Neural Network Potential on the right side of the screen.
Proceed to the NNP setting screen and start training the neural network from . (Set #Processes to 1 for local calculation on Windows)
Once the training is finished, return to NNP tab and click force-field in the result view to save the force field file.
To perform molecular dynamics calculation using the created force field file, create a new LAMMPS project. Set Type of Force Field to NeuralMD in the Force-Field setting screen, and select the created force field file in Potential File.
Add / remove geometries
When a grand-project is created, there is only one original geometry. To add more, click Add Sample Geometry and double-click the project or atomic structure file you’d like to include.
You can also drag & drop the atomic structure file in the grand-project view.
Each original geometry is displayed in its own column.
You can copy / paste / delete a column using the right-click menu.
Alternstively, the column can be removed by
 at the top.
Shortcut keys are available for manipulation of the columns.
Operation
Copy
Ctrl + C
Paste
Ctrl + V
Delete
Ctrl + D
Rename
F2
* For macOS, replace Ctrl → command .
Hint
For example, you can incorporate multiple geometries, such as bulk and slab models, into a single grand-project, allowing you to export the aggregated training data.
Additionally, the system enables the generation of random geometries by utilizing multiple configurations derived from a single original geometry. Initially, only one configuration (Random Geometries #1). You can add / remove configuration by using Add Random Geometries / Remove Random Geometries options in the column.
Hint
For example, you can generate random geometries from a single original geometry using two configurations, one can be used as training data, and the other as testing data.
Configuration on original geometry / random geometries generation
- Edit Input File of Q.E.
Configure the SCF calculation settings. These configurations will be applied to the calculations of random geometries listed in the column. If there are multiple columns, any changes made to the setting will be reflected across these columns (in order to equalize the SCF calculation condition within the training data).
- Edit Geometry by Modeler
Edit the original geometry using the modeler.
- Add Random Geometries / Remove Random Geometries
Add / remove configuration for generating random geometries from the original one.
- Use for Training NNP / Use for Testing NNP
Designate whether the random geometries will be used for training / testing data. The configuration here determines the scope of aggregation when exporting the data.
The state of checkboxes is visually represented by colors next to the title. This allows for quick identification even when the configuration view is collapsed.

- Generating Geometries
- Randomly Atomic Shift
generate new geometries by randomly shifting atoms from their original positions.
- Trajectory of MD (LAMMPS)
perform molecular dynamics calculation using LAMMPS from original geometry, and extract geometries from its trajectory. Click the Calculate MD button to open the LAMMPS interface, configure the settings, and run the calculation by Run from the lower left menu.
- Monte-Carlo (Metropolis)
using NeuralMD, generate structures through Monte-Carlo calculations Metropolis method, starting from the original structure. Prior to this, the neural network must be pre-trained. Click the Calculate MC button, which open the Metropolis setting view. In the view, configure the settings, and initiate the calculation by selecting Run from the lower left menu.
Click on Generate Geometries to generate (or extract) random geometries using specified settings.
- Self-Learning Hybrid MC
Execute the Self-Learning Hybrid MC method (SLHMC) and utilize the structures generated during the process. To begin, click the Edit SLHMC Input button to access the SLHMC setting screen. After configuring the settings, close the tab to return to the previous screen. Then, start the calculation by clicking the Run button.
The default parameters on the SLHMC settings screen are intended for generating the structures, and thus, they differ from those used for generating the force field.
As SCF calculations are already performed in the SLHMC process, it is not necessary to conduct separate calculation using Quantum ESPRESSO.
Note
If there is fixed atom(s), the coordinates remain unchanged when generating random geometries.
- Calculation of Q.E.
Execute SCF calculations for the generated random geometries.
Calculations for different configurations within the same grand project can be performed on separate servers.
In the result view, you can monitor the status of your calculations. Click download button
 to download the complete set of results and update the progress (this update is not automatic to prevent excessive load). The outcomes of completed calculations are summarized under Energy and Force.
Click and activate the
 button to prevent automatic download when gathering training data.
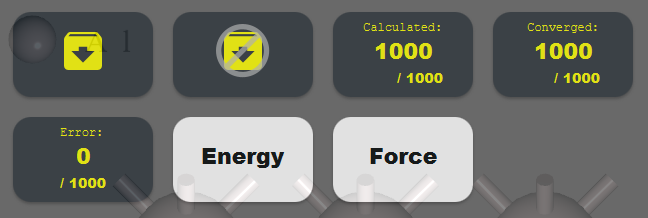
Training / testing neural network
Click Start Training NNP under Training Neural Network Potential on the right side to compile the completed calculations from the grand-project. This compiled data is then used as training data in the subsequent screen to train the neural network.
If calculations are conducted on the server, the results are automatically retrieved and summarized.
For detailed information on the setting items, refer to the corresponding sections in the configuration file description sannp.prop and sannp.behler in the NeuralMD document.
If Training w/o Force is set to yes, the force component of the loss function is set to 0, and only energy is utilized for the training.
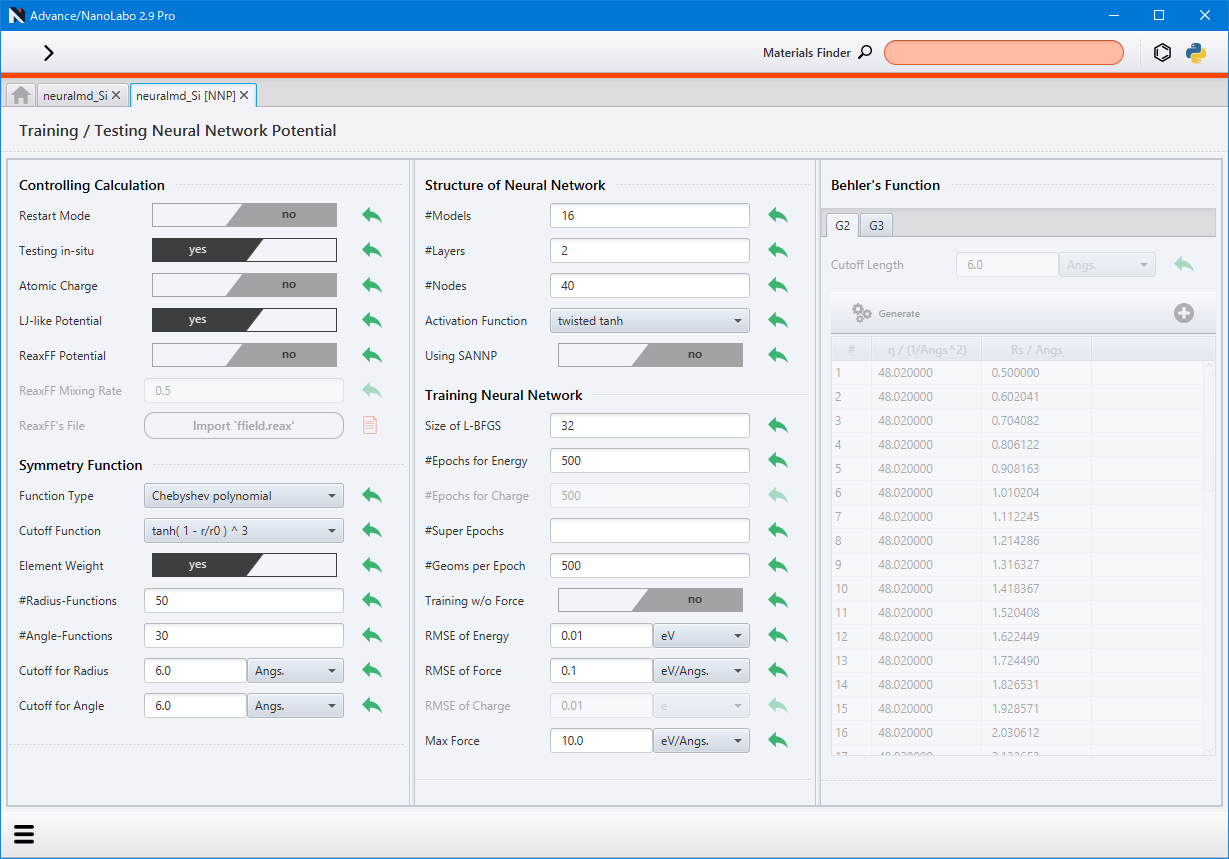
After completing the settings, initiate the training (optimization) process by selecting Run in the lower left menu.
Note
Set #Processes to 1 for local calculation on Windows, as Windows version of NeuralMD does not currently support MPI parallelism. OpenMP parallelism is available.
Hint
You can enhance calculation speed by utilizing a GPU if you are using the Advance/NeuralMD Pro edition.
(Linux only) To execute calculations locally, specify the number of GPU(s) to be used in the Number of GPU setting, found under . If multiple GPUs are utilized, MPI parallel processes are evenly distributed across the GPUs.
To execute calculations remotely, enable the GPU setting in the queue of the ssh server setting.
Note
The installation of a GPU driver is required prior to use. Since CUDA 11.4.4 is being utilized, a driver version of 470.82.01 or later is necessary.
If the system contains five or more elements, the weighted symmetry function must be used (set Element Weight to yes).
After executing the calculation, return to the tab to display the Result screen and check the status of the calculation.
The status of convergence can be monitored by clicking the RMSE button.
If the Classical Potential (Δ-NNP method) is enabled, you can view the form of the classical potential in the LJ-like.pot.
Click force-field to save the trained neural network as a force field file compatible with LAMMPS.
Hint
To conduct molecular dynamics calculation using the created force field file, in a LAMMPS project, set the Type of Force Field to NeuralMD (or NeuralMD with charge) in the Force-Field setting screen, and select the created force field file in Potential File.
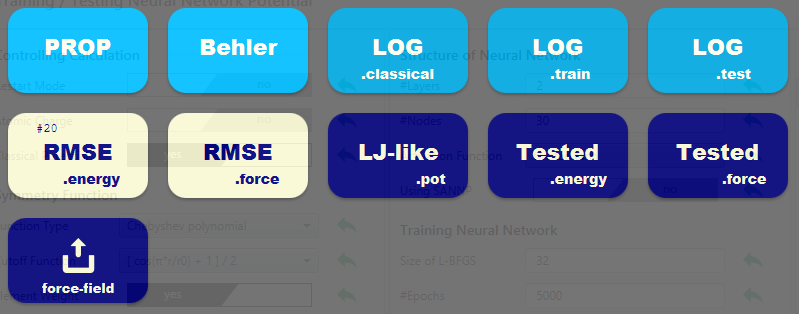
In a grand-project with an already trained neural network, you can initiate testing (to compare energy, force and charge with the training data) by clicking Start Testing NNP under Testing Neural Network Potential. The results can be reviewed by clicking the Tested button on the Result screen.
Importing training data / testing data
To import existing training data ( sannp.train ) / testing data ( sannp.test ) into the grand-project, open the NNP settings screen by clicking Open Project of NNP . Then, import the file by selecting either Import TRAIN-data or Import TEST-data from the lower left menu. A dialog box will appear, giving you the option to either replace the data in the grand-project or keep the existing data and append the new data to it.
Splitting training data
You have the option to split training data in the grand-project and convert a portion of it into test data. On the NNP settings screen, click Split TRAIN-data in the lower left menu. A dialog will appear, allowing you to specify the ratio of data to be split off as test data. If there is already test data in the grand-project, a confirmation dialog will ask whether you want to overwrite it.