SSH server settings
Click the icon  in the upper left corner of the screen, and then open .
Add server
To add a server, click the  button on the right of SSH Configuration, enter an identifiable name, and click OK. The name will appear in the list, and from now on, you can configure this server. The settings are saved automatically.
Hint
In the list, there is an example configuration called “FOCUS” for FOCUS supercomputer . If you intend to submit jobs to the FOCUS supercomputer, the easiest way is to select “FOCUS” from the list and configure it accordingly.
If you want to re-add the “FOCUS” setting after removing it, click from the icon at the top left of the screen .
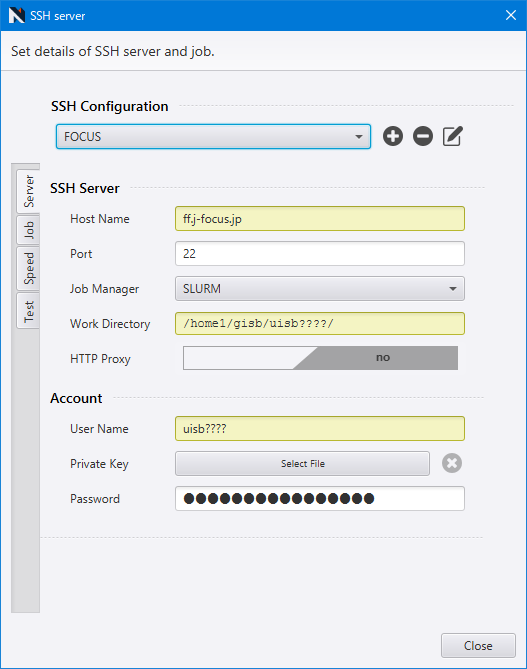
Server settings
In the Server tab, configure the settings related to the sever connection.
Host Name
- Port
Enter the host name (or IP address) and port number.
- Job Manager settings
Select a job manager used on the server. PBS, SLURM, and PJM are supported. Choose Raw allows you to execute the calculation directly without a job manager.
Warning
Typically, direct execution of calculations is not assumed on a server running a job manager. Please consult with the server administrator before the configuration.
- Work Directory
Enter the transfer destination (server directory path) for the files used in the calculation. Specify a location with write permission. Typically, the user’s home directory is suitable.
- Proxy Type
Utilize a proxy for the server connection. Use the proxy settings in . This is beneficial when submitting calculation jobs to external cloud virtual machines or similar environment where a proxy is required for internet connection.
- Account
Input the account information for SSH connection to the server.
For password authentication
Provide the User Name and Password. Private Key is not required.
For public key authentication
Enter the User Name and select the private key file by clicking on Private Key (clear with
 ). If a passphrase is set, enter it in the Password.
Hint
You cannot use PuTTY format private key files (extension
.ppk) directly. Please convert them to PEM or OpenSSH format before use.
If settings are correct, the tab turns white. If there is an issue, it will be displayed in red. Please review and check.
Job settings
In the Job tab, configure job posting settings for the server.
- Job Queue
List of queue names. Click
(  ) to add (remove) item. Even if you do not use a job manager, add a queue with any name.
Job Posting Command
- Job Script
Specify the command and job script for each queue. Default values for the job manager are automatically set when you add a queue. Modify them as needed.
Note
The actual content of the script to be executed is displayed when you submit a job.
Hint
When using the NeuralMD cooperation function with NeuralMD versions prior to 2.0, if the command in License Settings is required, add it to the job script here. It is not necessary if you are using remoteLicense or if it is set in the shell initialization file.
Add the following line before the line that runs the calculation (e.g. mpirun):
export ADVANCED_LICENSE_FILE=(license file path)/neumd.lic
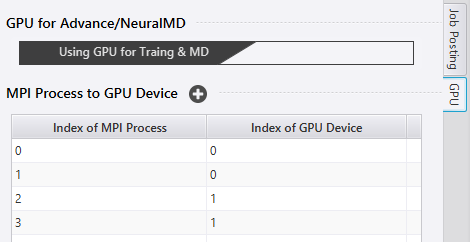
If the server is equipped with GPU(s), Advance/NeuralMD-related computations can be expedited using the GPU. Supported operations include the training of a neural network force field via Advance/NeuralMD (requiring an Advance/NeuralMD Pro edition license) and molecular dynamics simulations using a NeuralMD force field using LAMMPS. To utilize the GPU, open the GPU tab on the right side of setting window and enable GPU for Advance/NeuralMD .
If the server has multiple GPUs, by default, only the GPU with device ID 0 is utilized. To employ the GPUs more efficiently via MPI (Message Passing Interface) parallelization, you can assign a specific GPU to each process. You can add a row by clicking button and then enter the GPU device ID on the right side corresponding to the MPI process ID on the left side. To remove a row, click Delete in the right-click menu. Ensure that the number of rows matches the number of MPI parallel (processes) specified in Job Posting tab.
You can check the device ID assigned to each GPU by executing nvidia-smi -L on the server.
Note
The installation of a GPU driver is required prior to use. Since CUDA 11.4.4 is being utilized, a driver version of 470.82.01 or later is necessary.
These settings apply only to Advance/NeuralMD related calculations. They are independent of the GPU usage settings for other graph neural network force fields. Please refer to their respective environment configuration methods for information on their GPU usage.
For instance, on a machine with 2 graphic cards, if you wish to execute with 4 MPI parallel processes by allocating 2 processes to the GPU with device ID 0 and 2 to the GPU with device ID 1, you can configure it as follows.
Speed settings
In Speed tab, you can configure the intervals for retrieving information / downloading files from the server, as well the number of simultaneous accesses.
If frequent access is undesirable, adjust the sliders toward the Slow side to decrease the frequency of operations.
Connection Style is settings for the low bandwidth network.
- Online Mode
if set to Always OFFLINE mode, the system will not fetch results (download files) in real-time.
- Download Mode
you can configure settings to download Only Text Files, excluding large binary files etc.
- Download Time
you can set the interval (in minute) of batch downloading files in Always OFFLINE mode.
Hint
You have the option to choose whether to download SLHMC (automatic force field generation) data (the result from calculation engines stored in slhmc_dat folder), from . By default, this data is not downloaded.
Connection test
Once settings are configured, you can conduct a connection test to the server in Test tab to verify that the settings are correct.
The test is initiated automatically by clicking Start to Test Connection . The result is displayed as either TEST OF CONNECTION IS SUCCEEDED or ERROR HAS OCCURRED IN TESTING CONNECTION . If you receive the latter message, please re-check the settings.
Editing, deleting, copying settings
Settings within the tabs are saved on a per-server basis. To edit the settings for the previously saved server, select the server from the list.
Clicking on  to the right of the setting name opens a window where you can reorder, delete, and add settings with specified positions.
To add a new setting by copying existing configuration, press the button, then select the desired source setting in the dialog under Copy from.