License Setup and Update
If the machine where NanoLabo is installed is connected to the internet:
Please refer to the following License Setup (Online) or License Update (Online).

If the machine where NanoLabo is installed is not connected to the internet:
Please refer to the following License Setup (Offline) or License Update (Offline).

Note
To configure the license, you need a separate machine connected to the internet.
If the license configuration is not successful using the above steps:
Please refer to the following License Configuration (Using ACC) or License Update (Using ACC).
If you have purchased a floating license, please refer to Floating license before performing the above steps.

Warning
Please note that if you have purchased a floating license, the license configuration procedures for the license server and client machines are different.
Setting license
License Setup (Online)
After license registration, an Entitlement Certificate will be sent to you via email from noreply@sentinelcloud.com. Use the Product Key listed in the Entitlement Certificate to configure the license.
Launch NanoLabo and select from the menu
 in the upper left of the screen.
Note
After NanoLabo has been running for a certain period of time, a dialog regarding the license may appear automatically. In that case, please proceed with the subsequent steps in the same manner.
When starting for the first time, a dialog asking whether to use the old license will be displayed. Please select No.
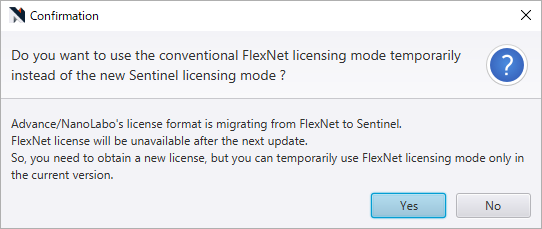
Note
If you select Yes (use old license), please restart NanoLabo according to the dialog. Also, the license type selected here can be changed later. Please check How to switch licenses (old license ⇔ Sentinel) for details.
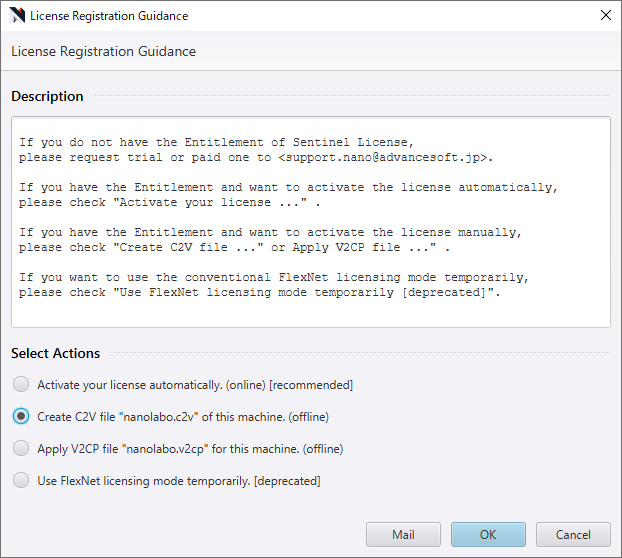
Clicking the OK button on the license error dialog will display the License Registration Guidance screen.
Select “Activate your license automatically. (online) [recommended]” and click the OK button.
Note
If you have not yet registered your license, clicking Mail here will open the email creation screen for a license request in your default mailer.

When the “Activate Sentinel License” dialog is displayed, enter the Product Key written on the Entitlement Certificate in the text field.
Note
After this, a V2CP file will be generated using the cURL command. If proxy settings or cURL command option settings are necessary, click the corresponding settings button
 and configure them in the displayed dialog.
When you click the OK button on the message dialog “Sentinel License has been activated, successfully.”, a dialog prompting you to restart NanoLabo will be displayed, so please click the Yes button.
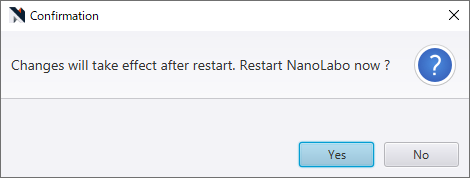
Note
If a dialog indicating that the creation of the C2V file, the creation of the V2CP file, or the application of the V2CP file has failed is displayed, please follow the steps from C2V File Creation onwards in License Configuration (Using ACC) to perform the settings. Regardless of the content of the dialog displayed, please start again from the steps in C2V File Creation.
After restarting NanoLabo, if you select again from the upper left menu, the “Select a Sentinel License Key” dialog will be displayed. Select the license key from the list and click the OK button.

Note
After NanoLabo has been running for a certain period of time, a dialog regarding the license may appear automatically. In that case, please proceed with the subsequent steps in the same manner.
This completes the license setup. If the “SUCCESS IN LICENSING” dialog is displayed, click the OK button to close the dialog. From the next startup onward, the license key selected this time will be automatically selected, so no license-related operations will be necessary.
License Setup (Offline)
After license registration, an Entitlement Certificate will be sent to you via email from noreply@sentinelcloud.com. Use the Product Key described in the Entitlement Certificate to configure the license.
C2V File Creation
Launch NanoLabo and select from the menu
in the upper left of the screen.
Note
After NanoLabo has been running for a certain period of time, a dialog regarding the license may appear automatically. In that case, please proceed with the subsequent steps in the same manner.
When starting for the first time, a dialog asking whether to use the old license will be displayed. Please select No.
Note
If you select Yes (use old license), please restart NanoLabo according to the dialog. Also, the license type selected here can be changed later. Please check How to switch licenses (old license ⇔ Sentinel) for details.
Clicking the OK button on the license error dialog will display the License Registration Guidance screen.
Select “Create C2V file “nanolabo.c2v” of this machine. (offline)” and click the OK button.
Click the OK button on the “C2V file has been created, successfully.” message dialog. A file browser will open. Move the displayed
nanolabo.c2vfile to a machine connected to the internet.Note
If a dialog appears indicating that C2V file creation failed, open the Admin Control Center (ACC) using the link in the message, and download the C2V file (extension: .c2v). For details, refer to License Configuration (Using ACC), and follow the steps from C2V File Creation onwards to configure the license.
V2CP File Creation
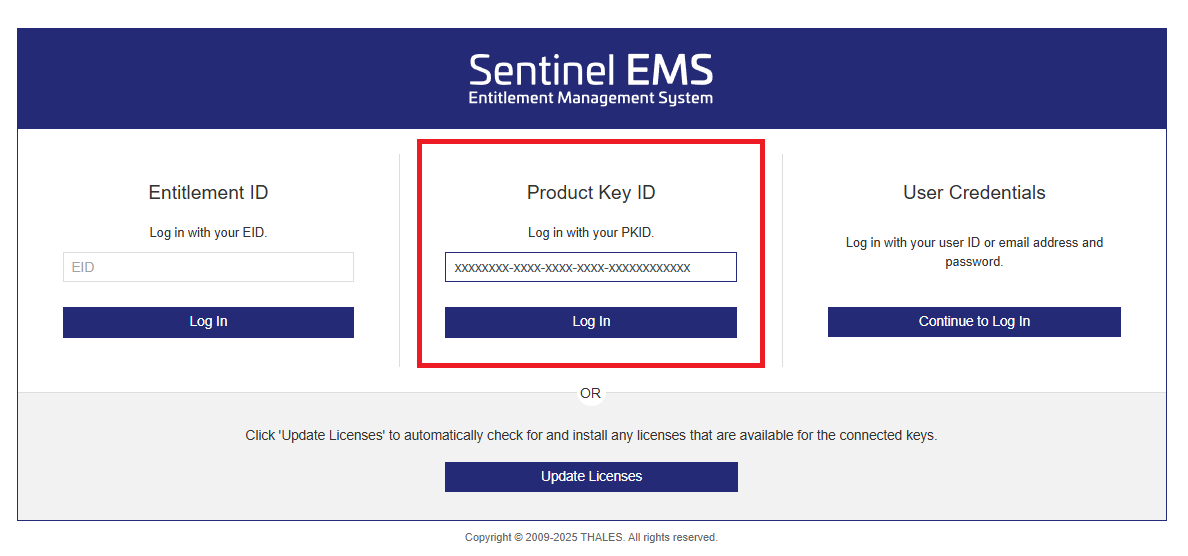
Access Entitlement Management System (EMS) from a web browser on a machine connected to the internet.
In the “Product Key ID” field, enter the “Product Key” found in the Entitlement Certificate and click the login button.
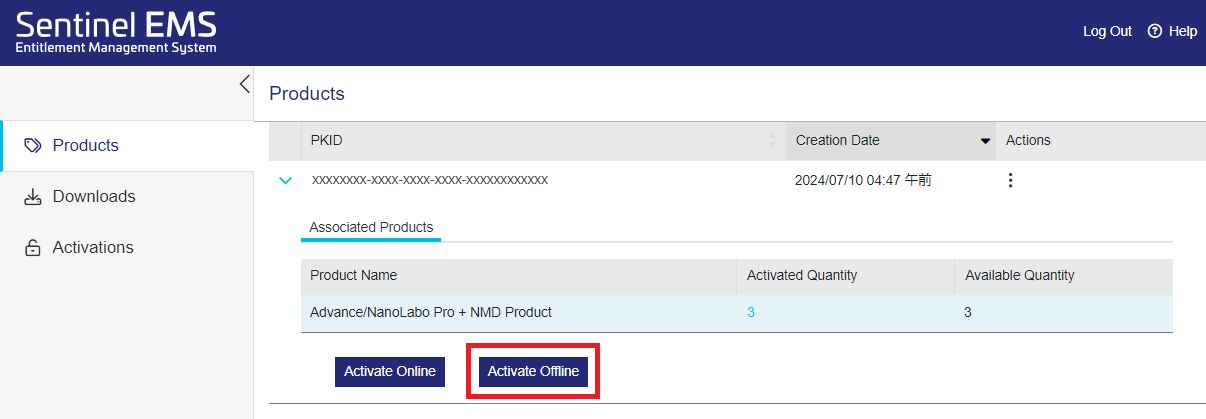
When the Products screen opens, click the Activate Offline button.
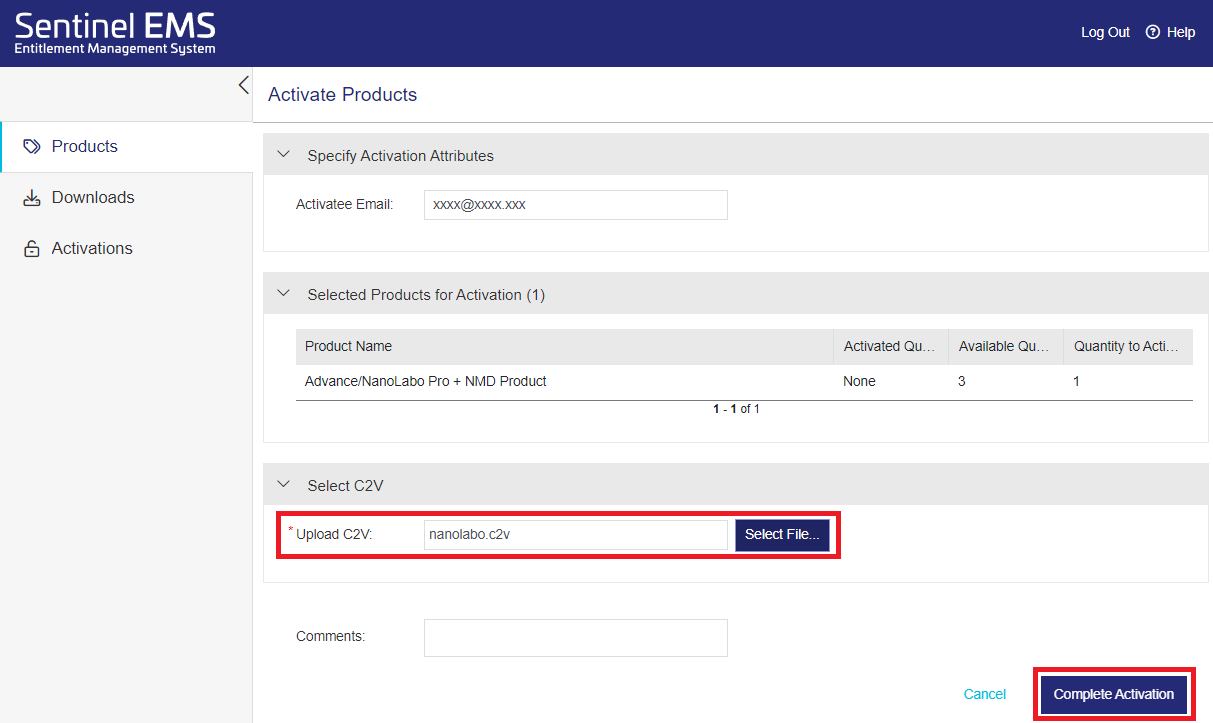
When the Activate Products screen opens, click the Select File button, select
nanolabo.c2v, and click the Complete Activation button.Warning
When updating the license, be sure to use the newly generated C2V file. Please be careful not to accidentally use one generated during previous configurations or updates.
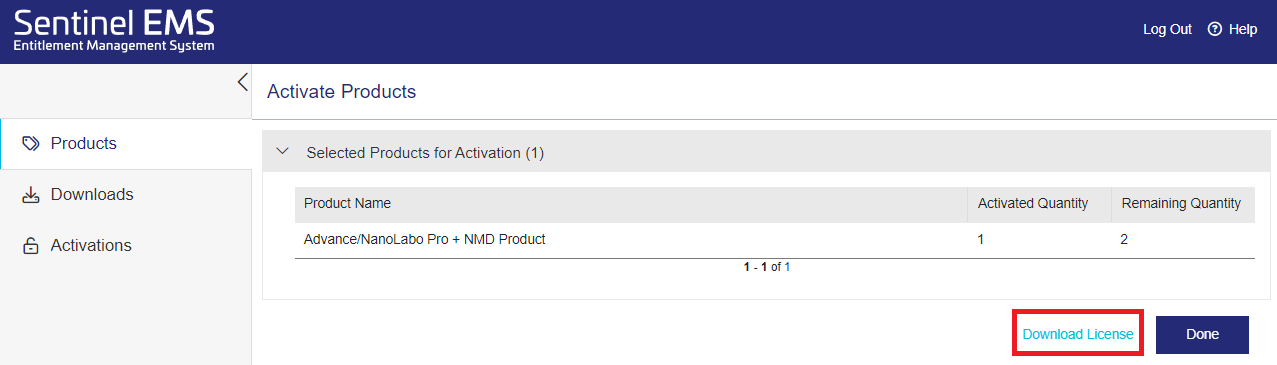
Upon successful activation, click Download License to download the V2CP file (extension: .v2cp).
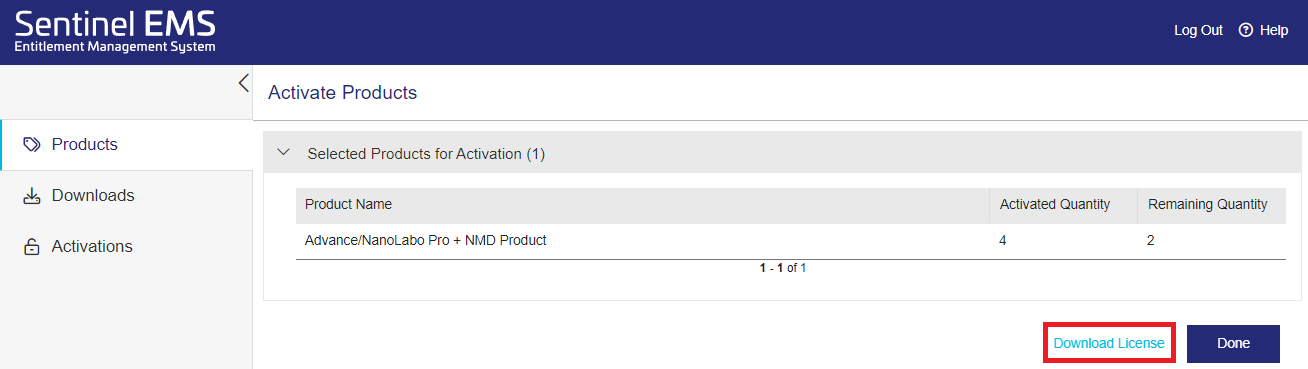
Note
Alternatively, an email with the same V2CP file (compressed) attached will be automatically sent. You can unzip and use this file.
Move the downloaded V2CP file to the machine where NanoLabo is installed.
Applying V2CP file
Restart NanoLabo. Then, as before, open the License Registration Guidance screen by selecting
from the menu in the upper left corner of the screen.When the License Registration Guidance screen is displayed, select “Apply V2CP file “nanolabo.v2cp” for this machine. (offline)” and click the OK button.

Note
Even if the downloaded V2CP file is not named
nanolabo.v2cp, you can still use this option.When the file browser appears, select the V2CP file downloaded in the previous step.
When the “V2CP file has been applied, successfully.” dialog appears, click the OK button. A dialog will then prompt you to restart NanoLabo; click the Yes button.
Note
If V2CP file application fails, open the Admin Control Center (ACC) from the link in the dialog and apply the V2CP file there. For details, see License Configuration (Using ACC) → Applying V2CP file.
License Key Selection
After restarting NanoLabo, select again from the menu
in the upper left corner of the screen. The “Select a Sentinel License Key” dialog will appear. Select the license key from the list and click the OK button.
Note
After NanoLabo has been running for a certain period of time, a dialog regarding the license may appear automatically. In that case, please proceed with the subsequent steps in the same manner.
This completes the license setup. If the “SUCCESS IN LICENSING” dialog is displayed, click the OK button to close the dialog. From the next startup onward, the license key selected this time will be automatically selected, so no license-related operations will be necessary.
License Configuration (Using ACC)
Note
Under normal circumstances, license configuration is completed through operations in NanoLabo and EMS (only if offline), and access to the Admin Control Center (ACC) is not required. Please refer to this section only if you cannot configure the license from NanoLabo.
After license registration, an Entitlement Certificate will be sent to you via email from noreply@sentinelcloud.com. Use the Product Key described in the Entitlement Certificate to configure the license.
C2V File Creation
In a web browser on the machine where NanoLabo is installed, access the Admin Control Center (ACC) (http://localhost:1947). ACC can also be accessed from offline machines.
Note
If you are using a floating license, access ACC (http://localhost:1947) in the web browser on the license server.
If a web browser is not available, refer to Floating license and access ACC on the license server from another machine where a web browser is available.
On the ACC Sentinel Keys screen, click the Fingerprint button in the row that lists 32462 in the Vendor column to download the C2V file
fingerprint_32462.c2v.Note
If keys for our other products are registered on the machine, the Fingerprint button will not be displayed in the row where the Vendor column shows 32462. In this case, click the C2V button displayed for the other product key to download the C2V file
(KeyID)_(timestamp).c2v.Warning
When updating the license, be sure to click the C2V button displayed for the license key you want to update, and download the C2V file
(KeyID)_(timestamp).c2v.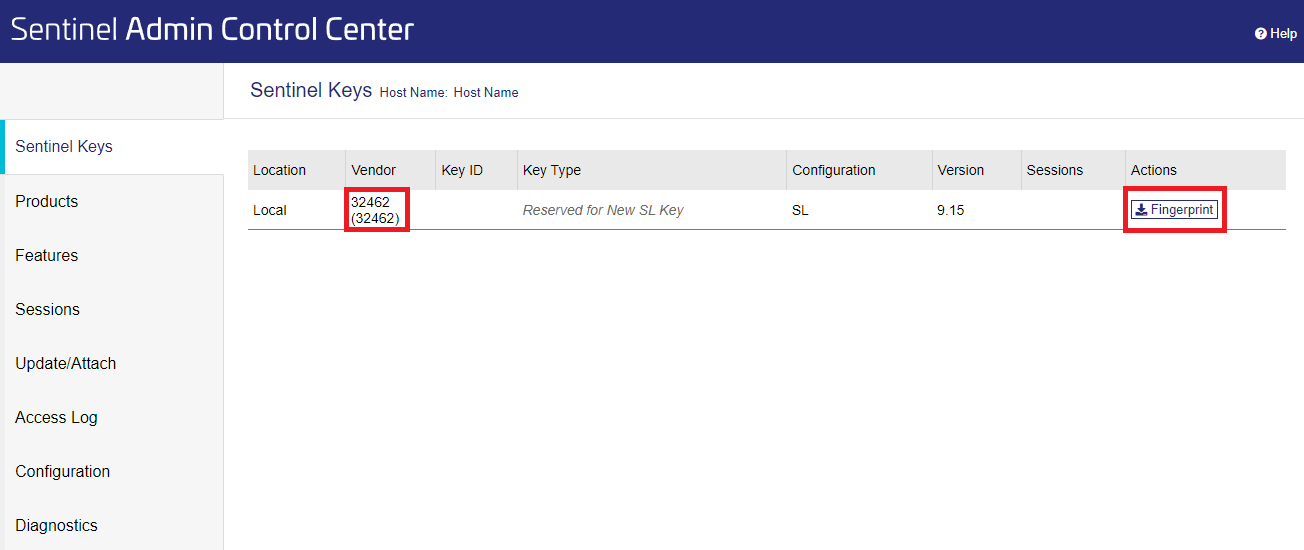
V2CP File Creation
Next, access EMS in a web browser.
Note
If the machine where you downloaded the C2V file is offline, move the C2V file to another online machine and then access EMS.
In the “Product Key ID” field, enter the “Product Key” found in the Entitlement Certificate and click the login button.
When the Products screen opens, click the Activate Offline button.
When the Activate Products screen opens, click the Select File button, select the C2V file you downloaded earlier, and click the Complete Activation button.
Warning
When updating the license, be sure to use the C2V file
(KeyID)_(timestamp).c2vdownloaded in the previous step, notfingerprint_32462.c2v.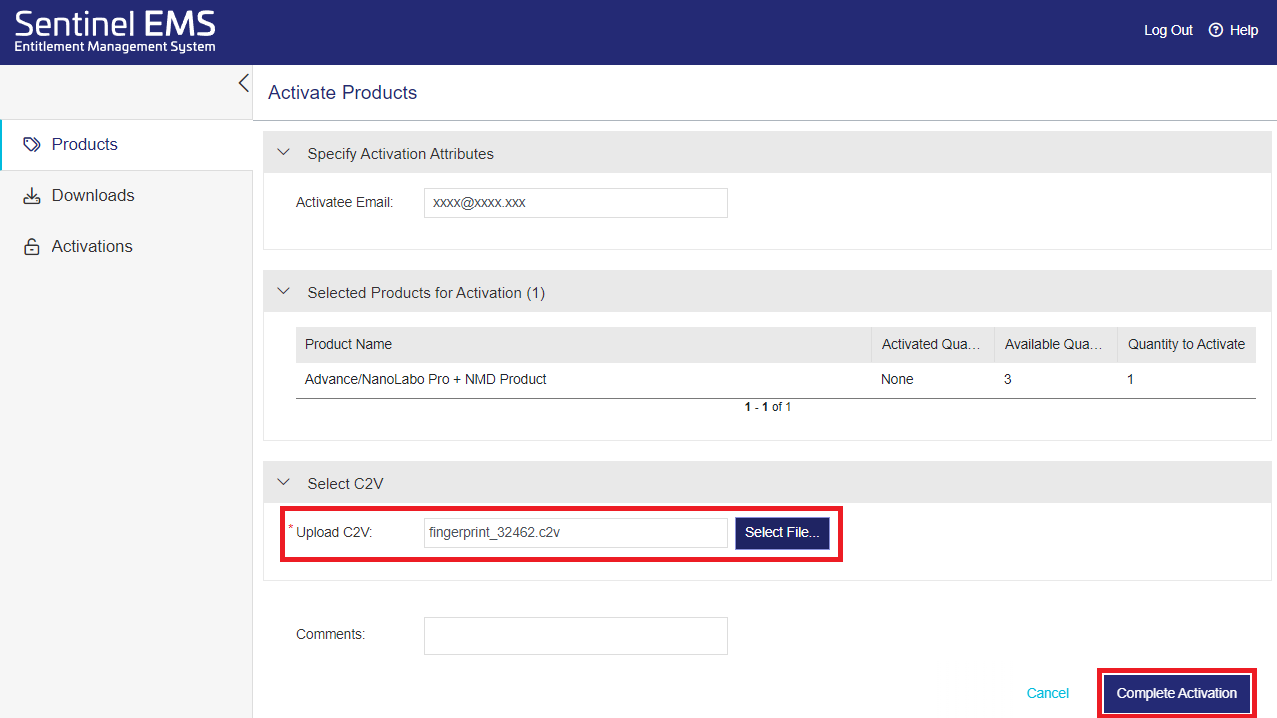
Upon successful activation, click Download License to download the V2CP file (extension: .v2cp).
Note
Alternatively, an email with the same V2CP file (compressed) attached will be automatically sent. You can unzip and use this file.
Please store the downloaded V2CP file in any directory on the machine where you use NanoLabo with a node-locked license, or on the machine used as the license server with a floating license.
Applying V2CP file
Return to the ACC screen and open the Update/Attach screen from the menu on the left. Click the Select File button, select the downloaded V2CP file, and click the Apply File button.
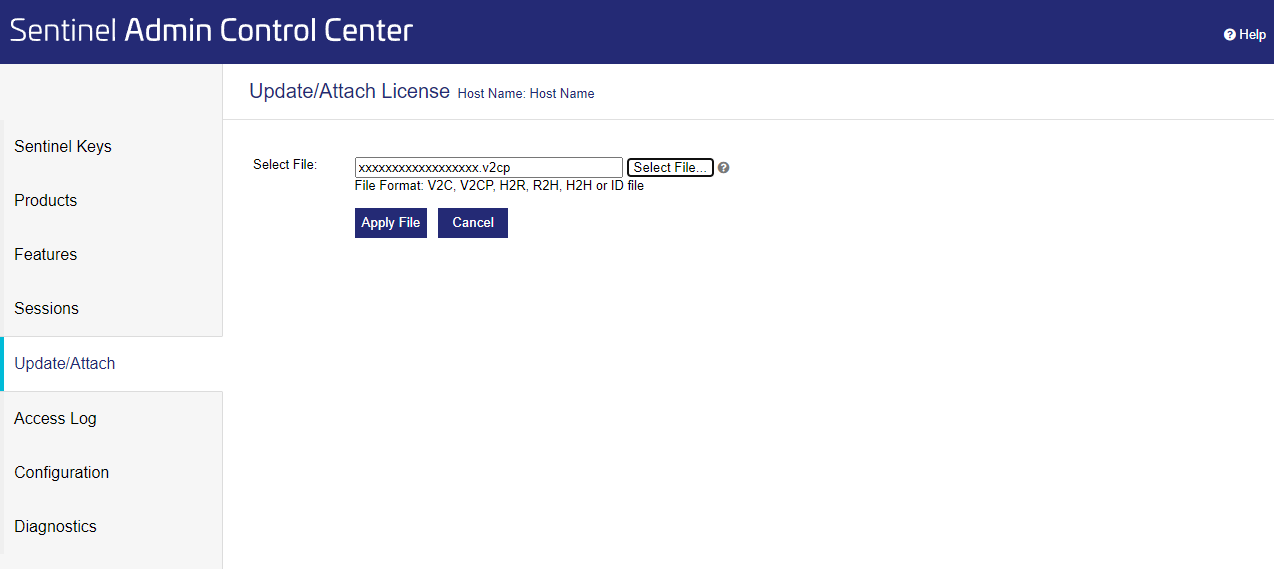
The license key becomes active when “Your update was applied successfully.” is displayed.
License Key Selection
Launch NanoLabo and select from the menu
in the upper left of the screen.
Note
After NanoLabo has been running for a certain period of time, a dialog regarding the license may appear automatically. In that case, please proceed with the subsequent steps in the same manner.
When starting for the first time, a dialog asking whether to use the old license will be displayed. Please select No.
Note
If you select Yes (use old license), please restart NanoLabo according to the dialog. Also, the license type selected here can be changed later. Please check How to switch licenses (old license ⇔ Sentinel) for details.
The “Select a Sentinel License Key” dialog appears. Select the license key from the list and click the OK button.
This completes the license setup. If the “SUCCESS IN LICENSING” dialog is displayed, click the OK button to close the dialog. From the next startup onward, the license key selected this time will be automatically selected, so no license-related operations will be necessary.
License Update
Please request a license update to support.nano@advancesoft.jp *.
* We do not accept commercial or promotional emails unrelated to our products or services to this address.
After registering the license, you will receive an email from noreply@sentinelcloud.com with a new Entitlement Certificate. Please use the Product Key provided in the email to update your license.
The basic operating procedure is the same as Setting license. However, please perform the update while keeping in mind the precautions described in each of the following sections.
License Update (Online)
Warning
Make sure to select the license key you want to update before starting the update process. Refer to How to check the license key and How to change the license key for instructions on how to check and change license keys. If there is only one license key, no specific action is needed.
If a dialog box concerning the license type, version, etc., is displayed automatically, click Yes or Close to open the License Registration Guidance.
When applying updates to the license or edition (such as adding concurrent users or upgrading to the Pro version) for a valid, latest-version Sentinel license, the License Registration Guidance will not be displayed. Instead, after launching NanoLabo, select from the menu in the upper left corner of the screen.
It is not necessary to select the key after restarting NanoLabo.
License Update (Offline)
Warning
Make sure to select the license key you want to update before starting the update process. Refer to How to check the license key and How to change the license key for instructions on how to check and change license keys. If there is only one license key, no specific action is needed.
Warning
Always use newly generated C2V and V2CP files. Please be careful not to accidentally use files generated during previous setups or updates.
If a dialog box concerning the license type, version, etc., is displayed automatically, click Yes or Close to open the License Registration Guidance.
When applying updates to the license or edition (such as adding concurrent users or upgrading to the Pro version) for a valid, latest-version Sentinel license, the License Registration Guidance will not be displayed. Instead, follow the steps below.
To create a C2V file, select from the menu in the upper left corner of the screen.
To apply a V2CP file, select from the menu in the upper left corner of the screen.
It is not necessary to select the license key after restarting NanoLabo.
License Update (Using ACC)
Note
Under normal circumstances, license updates can be completed through operations in NanoLabo and EMS (EMS is used only for offline updates), and access to ACC is not required. Please use ACC only if you are unable to update the license via NanoLabo.
Warning
Always use newly generated C2V and V2CP files. Please be careful not to accidentally use files generated during previous setups or updates.
Warning
When downloading the C2V file from the Sentinel Keys screen in ACC, be sure to download it by clicking the C2V button associated with the key you intend to update.
Note
The filename of the C2V file required when setting up the Sentinel license for the first time is fingerprint_32462.c2v, but the filename of the C2V file required for updates is (KeyID)_(timestamp).c2v.
Please select the license key after restarting NanoLabo if necessary.
Floating license
If you purchased a floating license, you can use NanoLabo on other machines (Windows, Linux, macOS*) connected via network to the machine where the license is set up. * Excluding macOS without administrator privileges.
Machine to be used as license server
Install NanoLabo and configure the license. The license manager starts automatically each time the machine boots, so no further action is required after the initial license setup.
Note
When using a machine without a GUI as the license server, instead of using the NanoLabo installer, please download and install Sentinel-LDK-RTE (License Manager).
tar -xf Sentinel-LDK-RTE-for-AdvanceSoft-v10.13.1_Linux.tar.gz
cd aksusbd-10.13.1
sudo ./dinst
# To uninstall, execute dunst in the same folder.
sudo ./dunst
License configuration requires accessing the license server’s ACC from a separate, network-connected machine capable of running GUI applications. Configure remote access to ACC using one of the methods below.
Edit
/etc/hasplm/hasplm.inion the license server with administrator privileges and configure the settings referring to the example below.
Configuration example for /etc/hasplm/hasplm.ini
Warning
If adminremote already has a different value set, there is no need to change it. Only modify the value for accremote.
With these settings configured, you can access the license server’s ACC by entering http://<license server IP address>:1947 in the address bar of a web browser on a different machine.
Note
It is recommended to set a password via the GUI after connecting to the remote ACC. Select Configuration on the left side of the ACC screen, open the Basic Settings tab, and set the password scope and password in the Password Protection section. This password is required to access the selected scope (either the ACC configuration pages or all pages).
Use SSH port forwarding to access the remote ACC. Please refer to this document for more details.
After connecting to ACC, follow the instructions in License Configuration (Using ACC) to configure the license.
Note
If TCP/UDP port 1947 is not open in the firewall settings, change the settings to open it. (For Windows machines, these ports are automatically opened during installation, so firewall configuration is usually not required.)
Machine to be a client to use NanoLabo
Install and launch NanoLabo. In the “Select a Sentinel License Key” dialog that appears, select the license key you wish to use. This key will be registered as the default, so no further action is needed during subsequent launches.
Note
If a client machine is on a different network segment from the license server and the server’s IP address or hostname was not set during NanoLabo installation, follow the steps below to configure it.
For Windows or Linux client machines
Create (or edit if it exists) the
hasp_32462.inifile in the directory specified below. Add a line with the license server’s IP address or hostname, referring to the example below.
Windows:
%LocalAppData%\SafeNet Sentinel\Sentinel LDK\Linux:
$HOME/.hasplm/
For IP address 192.168.00.000:
For macOS client machines
On the client machine, open a web browser and navigate to the Admin Control Center (ACC) at http://localhost:1947 . Then, select Configuration from the menu on the left.
Next, open the Access to Remote License Managers tab, enter the license server’s IP address or hostname into the Remote License Search Parameters field, and click Submit.
How to check the license key
Select from the menu ![]() in the upper left corner to view information about the currently selected key, such as its ID.
in the upper left corner to view information about the currently selected key, such as its ID.
More detailed information is available in the Admin Control Center (ACC).
Note
You can also access the local ACC from the NanoLabo menu ![]() in the upper left corner by selecting .
in the upper left corner by selecting .
If the selected key is invalid (e.g., because it has expired), a license error dialog will appear, showing the ID of the invalid key.
How to change the license key
If you have multiple license keys, you will use NanoLabo by logging in with one of them. To change the license key used for login, follow the instructions below.
Selecting from the menu ![]() in the upper left corner displays the “Select a Sentinel License Key” dialog box. Select a license key from the list and click the OK button.
in the upper left corner displays the “Select a Sentinel License Key” dialog box. Select a license key from the list and click the OK button.
Note
If the key selected by default is invalid (e.g., expired), clicking the Select Key button on the license error dialog will display the “Select a Sentinel License Key” dialog box.
Note
‘logins’ in the list indicates the current number of active logins for the features of that license key. Additionally, ‘concurrency’ indicates the maximum number of simultaneous logins permitted for the features of that license key.
If a dialog box appears prompting you to restart NanoLabo, click the Yes button to restart NanoLabo.
The selected key will be registered as the default key, so you do not need to select it again on future startups.